Have you ever walked out of a salon in Orchard looking like you spent thirty minutes wrestling an exceptionally angry sun? For the 50% of women who identify as having delicate complexions, upper lip waxing for sensitive skin often feels less like a glow-up and more like a high-stakes gamble with a “mustache” of persistent redness. You just want that pesky fuzz gone without the 48 hour breakout or skin tearing that usually follows, right? We know the struggle is real, honey, and your face deserves better than a “naughty” reaction to a simple beauty fix.
You shouldn’t have to choose between a silky finish and skin that actually behaves itself. We promise you can achieve that perfectly smooth, bee-autiful look without the dreaded bumps or irritation that keep you hiding indoors. It is time to ditch the fear and embrace a fuzz-free life with zero drama. This guide reveals our top Queen Bee secrets for a sting-free experience, the best wax types for Singapore’s humidity, and the expert-level aftercare steps that keep you looking gorgeous from the second you leave the chair.
Key Takeaways
- Discover why your delicate upper lip needs a little extra honey-sweet TLC to stay fuzz-free for weeks without the sting.
- Learn why hard wax is the “Queen Bee” of hair removal, shrink-wrapping your fuzz rather than tugging on your skin.
- Master our 5-step guide to upper lip waxing for sensitive skin, including the “barrier method” trick to keep redness at bay.
- Uncover the essential “No-Touch” rule and the soothing ingredients you need to banish the red mustache for good.
- Get the insider buzz on prepping your skin like a pro for a silky-smooth finish that keeps you looking bee-autiful.
The Buzz on Upper Lip Fuzz: Why Sensitive Skin Needs Extra Love
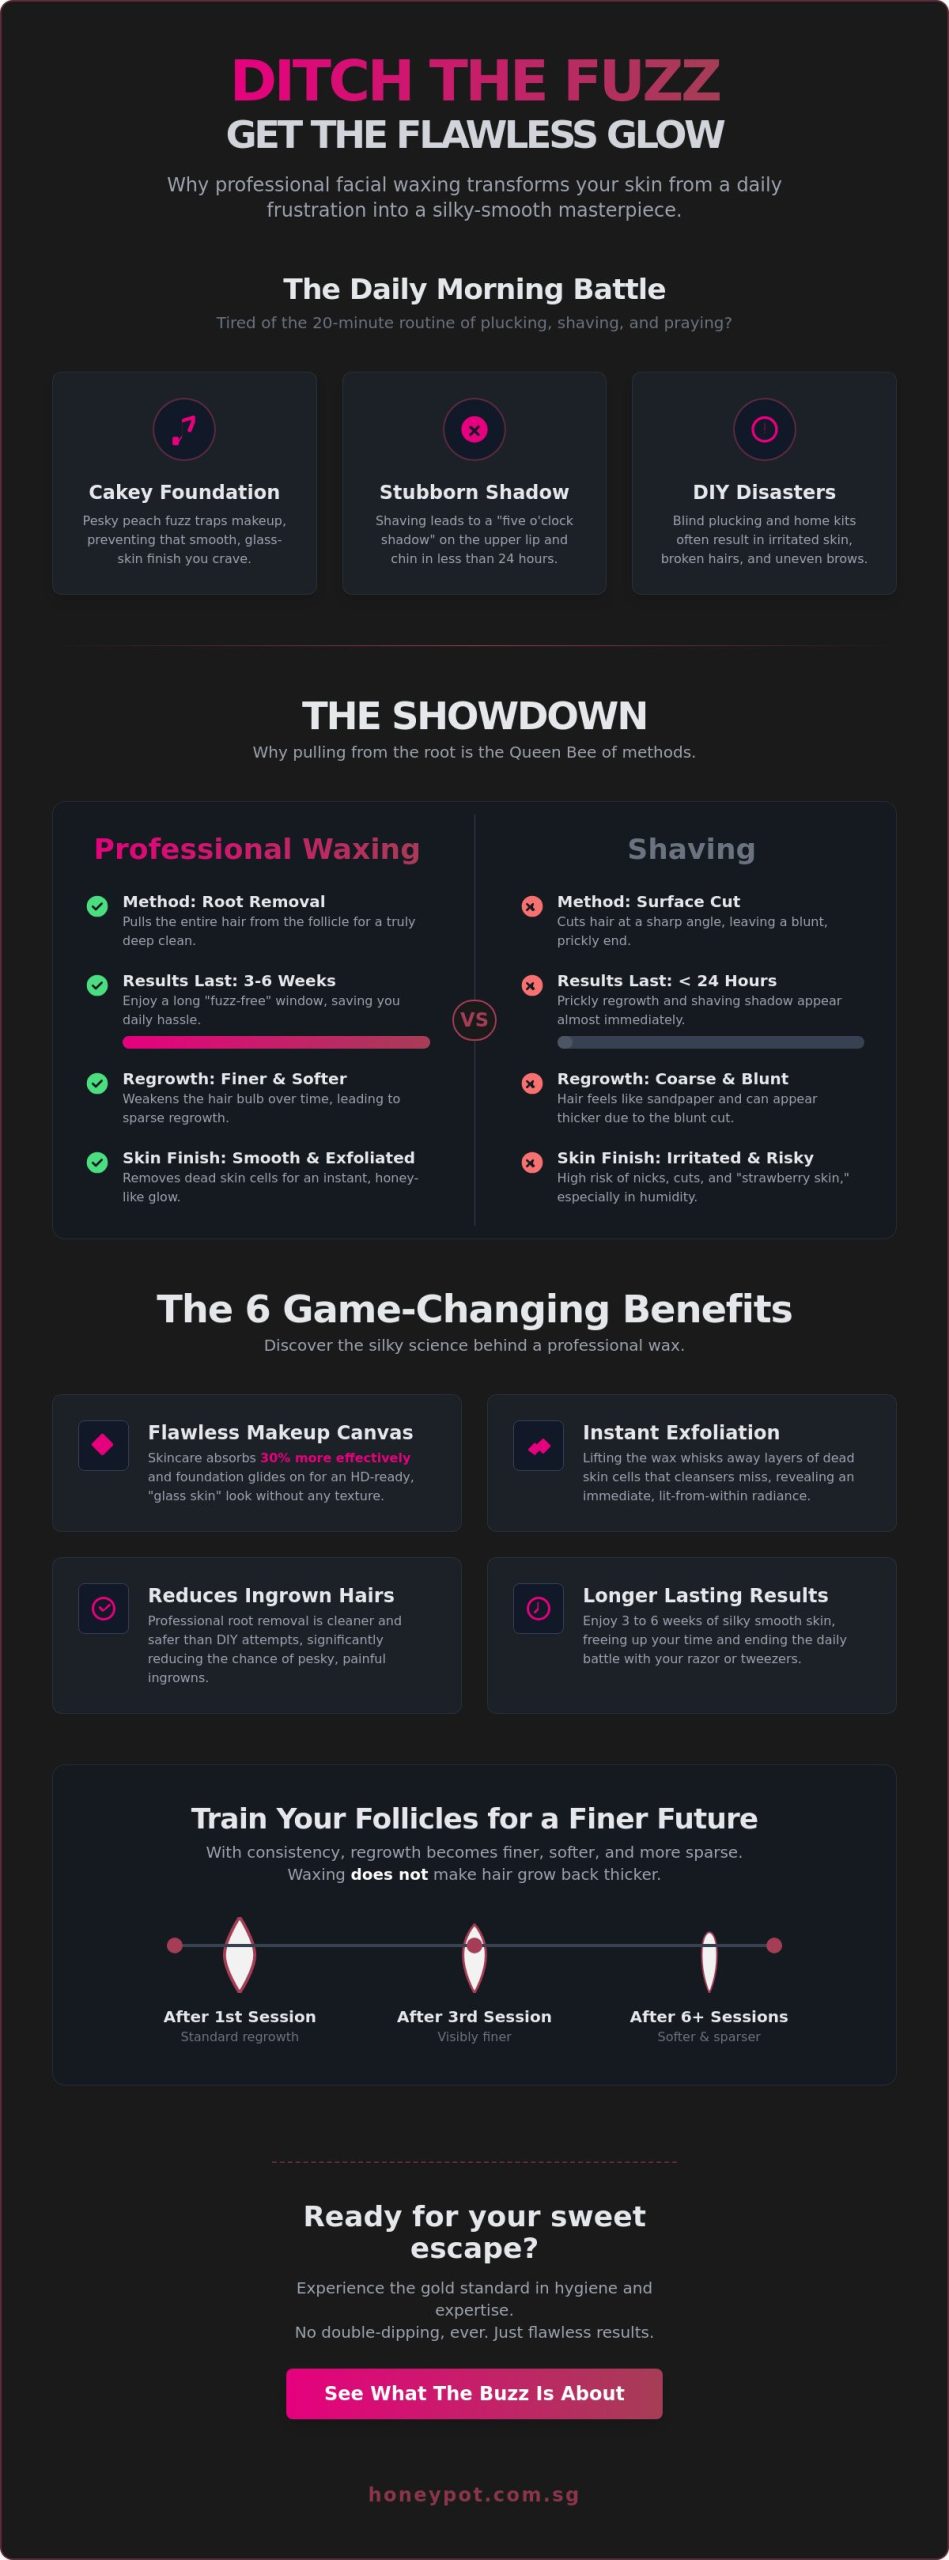
Let’s be real, honey, nobody wants a shadow hovering over their favorite lipstick. Upper lip waxing is the ultimate way to stay fuzz-free for up to four weeks because it removes hair right from the root. For those of us in Singapore’s humidity, keeping that area smooth is a total game changer. You might be terrified of the dreaded “red mustache” if your skin throws a tantrum at the slightest touch. That lingering irritation happens when the skin’s barrier gets grumpy from poor technique or harsh ingredients. While a DIY kit might seem like a S$15 shortcut, professional upper lip waxing for sensitive skin ensures you leave looking gorgeous, not glowing red.
The Anatomy of a Sensitive Lip
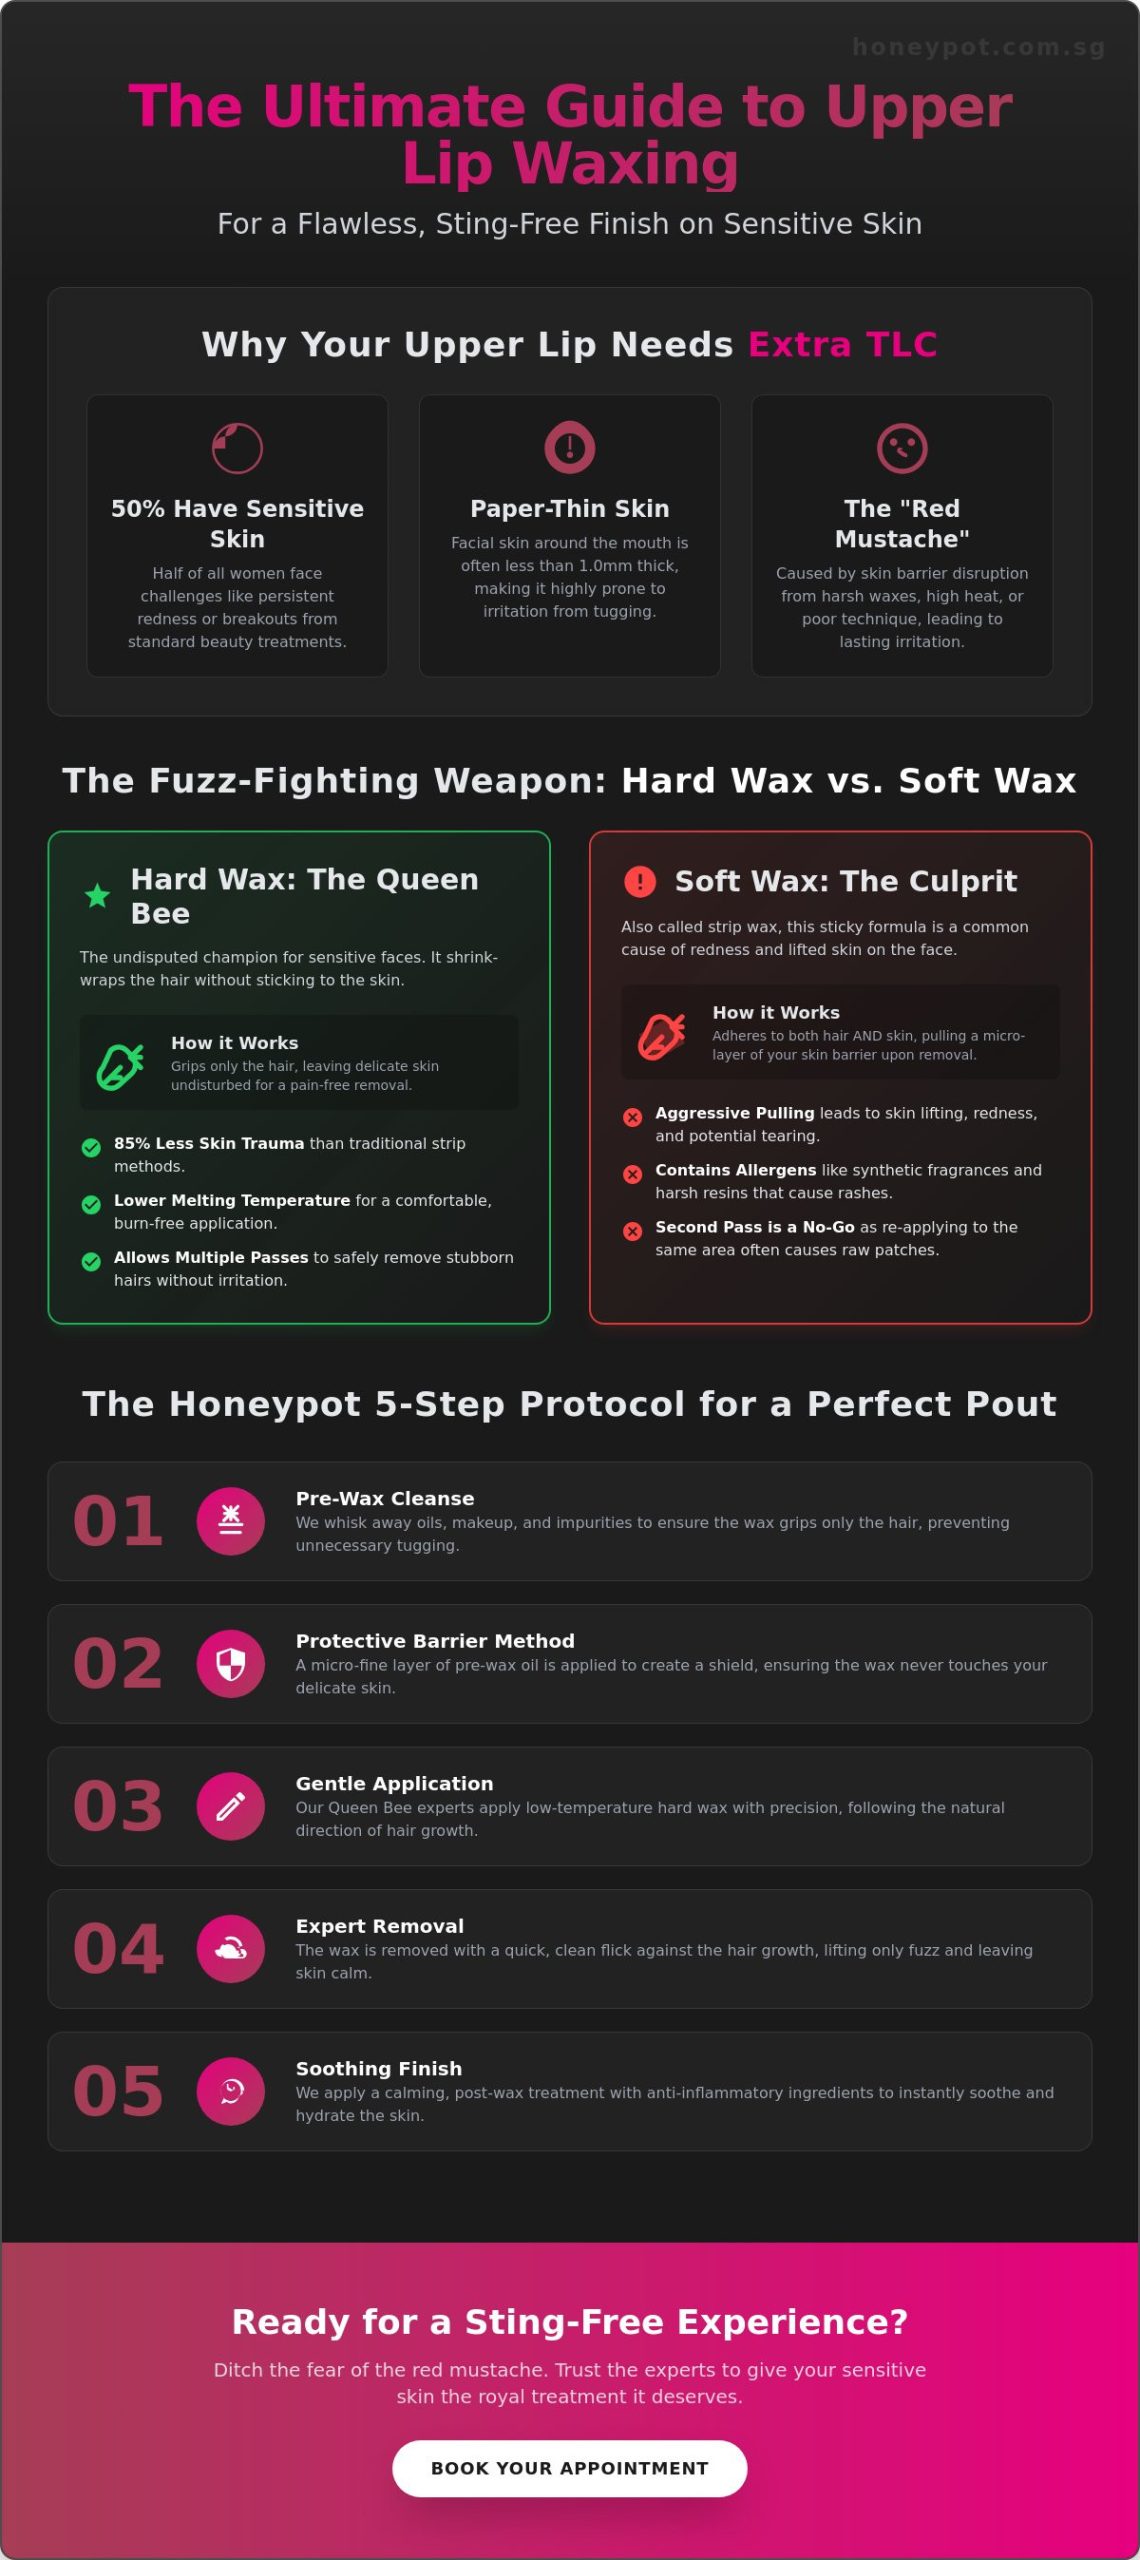
Your facial skin is incredibly delicate. It often measures less than 1.0mm in thickness around the mouth, making it far thinner than the skin on your legs or arms. This zone is a high-traffic area for nerve endings and blood vessels. When you apply high-heat waxes or use aggressive tugging, your skin reacts instantly. This is why upper lip waxing for sensitive skin requires a gentle touch and specialized formulas. Low-quality waxes often grip the skin instead of just the hair. This leads to that painful “lifted” feeling that ruins your post-salon vibe.
Waxing vs. Threading: The Great Debate
Many honeys think threading is the natural choice. However, the repetitive friction of a twisting thread can be brutal on reactive skin. It often causes tiny tears or folliculitis. In contrast, Waxing provides a smooth, singular motion that limits contact time with your skin. You also get a light exfoliation that threading misses, leaving your pout feeling silky. Choosing a pro who understands these nuances is the difference between a smooth finish and a week of hiding under a face mask. We focus on precision so you can focus on being your most bee-autiful self.
Hard Wax vs. Soft Wax: Choosing Your Fuzz-Fighting Weapon
Not all waxes are created equal, honey. When you step into a professional boutique, you’ll usually encounter two main contenders: hard wax and soft wax. For your delicate pout, the choice makes all the difference between a smooth finish and a week of hiding under a face mask. Soft wax, often called strip wax, is a common culprit for irritation. It’s sticky and adheres to both the hair and the skin. When that strip is pulled, it takes a tiny layer of your skin barrier with it. That’s why it often feels too aggressive for upper lip waxing for sensitive skin.
Hard wax is the undisputed champion for reactive faces. It works by “shrink-wrapping” the hair without sticking to the skin itself. As the wax cools, it creates a firm grip around even the tiniest fuzz. When our experts flick it off, it only takes the hair, leaving your skin undisturbed. Temperature is another huge factor. High-quality hard wax melts at a much lower temperature than soft wax. In Singapore’s humid climate, your skin is already working hard, so avoid the “burnt” feeling by choosing a cooler, more comfortable application.
Why Hard Wax is the Queen Bee for Faces
Hard wax is the ultimate multitasker for your face. Because it doesn’t lift the skin, it allows for multiple “passes” if you have a few stubborn hairs that refuse to leave. With soft wax, a second pass on the same spot is a big no-no that leads to raw patches. Hard wax ensures a cleaner removal with 85% less trauma to the skin compared to traditional strip methods. It leaves you feeling silky and smooth without the drama of a red, angry upper lip.
Ingredients to Watch Out For
Don’t let cheap waxes ruin your glow. Many budget-friendly options are packed with synthetic fragrances and harsh resins that act as major allergens. These can cause a “histamine reaction,” which looks like tiny white bumps or a persistent rash. Professional boutiques use high-quality blends designed for upper lip waxing for sensitive skin. These often include soothing ingredients that calm the area while the wax works its magic. Always ask your waxer about the ingredients; your skin deserves the royal treatment, not a chemical cocktail.
The Honeypot Guide: 5 Steps to a Smooth, Red-Free Upper Lip
Getting that silky, fuzz-free look shouldn’t feel like a battle with a swarm of angry bees. When it comes to upper lip waxing for sensitive skin, our Queen Bee experts follow a strict protocol to keep you looking gorgeous without the post-wax pout. It is all about the technique, honey!
- The Pre-Wax Cleanse: We start by whisking away Singapore’s humidity, oils, and makeup. A clean surface ensures the wax grips the hair, not the debris, preventing unnecessary tugging.
- The Barrier Method: This is a game-changer for sensitive types. We apply a microscopic layer of light oil or botanical powder. This creates a safety shield so the wax sticks to the hair and leaves your skin alone.
- Precision Application: Forget those giant “one-size-fits-all” strips. We work in tiny, manageable sections. This follows the natural curve of your lip and minimizes trauma to the tissue.
- The Quick Flick: Speed is our secret weapon. A fast, decisive pull reduces the “ouch” factor and prevents the skin from lifting.
- Immediate Calming: The moment the hair is gone, we apply firm pressure and a cooling touch. This “shocks” the nerves into silence and stops redness before it starts.
Pre-Wax Prep for Sensitive Honeys
Your prep starts at home, gorgeous. You must hit the pause button on retinols, AHAs, or BHAs for at least 3 to 5 days before your appointment. These powerful ingredients make your skin extra thin and prone to lifting. Also, remember to drink your water! Staying hydrated ensures your hair follicles are supple, allowing the hair to slide out cleanly from the root rather than snapping off.
The Art of the Pull
Technique is everything in our hive. To prevent bruising or “strawberry skin,” we keep your skin stretched as taut as a drum during the pull. This provides a stable surface and keeps the discomfort to a minimum. Here is a pro tip: take a deep breath in and exhale sharply right as we pull. This simple trick distracts your nervous system and helps you breeze through the sting like a total pro.
Ready to ditch the peach fuzz and embrace the smooth? Book your expert wax at Honeypot today and experience the gentlest touch in Singapore.
Post-Wax TLC: Banishing the Red Mustache for Good
You’ve braved the strip and emerged victorious, honey! Now, the goal is to keep that skin silky and avoid the dreaded “red mustache” look. Upper lip waxing for sensitive skin requires a little extra love once the hair is gone. Your skin is currently in a vulnerable state, so treat it with the same care you’d give a delicate silk gown.
First, follow the “No-Touch” rule religiously for at least 24 hours. Your follicles are wide open and practically inviting bacteria to a party you didn’t authorize. Touching the area with unwashed hands can lead to tiny white bumps or breakouts. Keep your paws off and let the skin breathe. You should also skip the heavy makeup or perfumed lotions for the first day; let your natural glow do the talking instead.
The Singapore sun is no joke, and a freshly waxed lip is extra prone to UV damage. Sun exposure on sensitized skin can cause hyperpigmentation, leaving you with a dark shadow that’s much harder to remove than fuzz. Slap on a high-SPF sunscreen before you step out of the house. If you’re planning a beach day at Sentosa, wait at least 48 hours after your appointment to avoid irritation from salt water and intense heat.
The Honeypot Aftercare Ritual
Keep your cool with a Soothing Serum right after your session. It’s packed with anti-inflammatory ingredients like aloe or chamomile to calm the storm instantly. If you’re prone to those pesky post-wax bumps, our Ingrown Hair Cream is your new secret weapon. It keeps the area clear and prevents hairs from getting trapped under the surface. Wait exactly 72 hours before reaching for a gentle crystal scrub to keep the area smooth and prep for your next visit.
When to See a Professional
We’ve all heard the horror stories of DIY waxing gone wrong; think torn skin, bruising, or patchy results. When you prioritize professional care for upper lip waxing for sensitive skin, you avoid these risks entirely. Our therapists are the ultimate insiders who turn a necessary chore into a naughty but nice experience. Book an appointment at our boutique for a “Queen Bee” treatment that guarantees a gorgeous, sting-free finish every single time.
Ready to Flaunt Your Silky, Sting-Free Smile?
Don’t let the fear of a red, angry upper lip keep you from feeling your most gorgeous self. You’ve now got the inside scoop on why choosing specialized hard wax over aggressive soft wax is the ultimate game-changer for your delicate skin. By following a dedicated pre- and post-wax routine, you can finally say goodbye to the dreaded red mustache and hello to a flawless finish. Mastering upper lip waxing for sensitive skin is all about using the right technique and the most gentle tools available.
At Honeypot, we’ve spent over 20 years perfecting the art of the smooth, earning our reputation as Singapore’s award-winning boutique for meticulous grooming. We use custom hard wax blends specifically designed for sensitive types, ensuring the wax grips the fuzz and never your skin. Our expert therapists are trained in our signature “Queen Bee” technique to keep discomfort to an absolute minimum while you relax in our glamorous sanctuary. You deserve a glow that’s all honey and no sting, delivered by the most confident insiders in the business.
Ready for a fuzz-free, bee-autiful smile? Book your Upper Lip Wax at Honeypot today!
It’s time to treat yourself to the silky, pout-perfect results you’ve been dreaming of, honey!
The Buzz on Fuzz: Your Upper Lip Waxing FAQs
How long does redness last after upper lip waxing?
Redness typically fades within 2 to 4 hours for most skin types, though sensitive complexions might stay a bit rosy for up to 24 hours. It’s just your skin’s natural way of reacting to the buzz of the wax. Apply a chilled aloe gel or a post-wax honey serum to calm the hive. If that flush sticks around past the 24 hour mark, give your aesthetician a shout, honey.
Will waxing my upper lip make the hair grow back thicker?
No, upper lip waxing for sensitive skin actually encourages your hair to grow back finer and softer over time. When we pull the hair from the root, it weakens the follicle, often leading to a 30% reduction in hair density after consistent sessions. You won’t sprout a beard; you’ll find your fuzz becomes much less noticeable if you stick to your 4 week schedule.
Can I wax my upper lip if I use Retin-A or Accutane?
You must stop using Retin-A at least 7 days before your appointment, and you should be off Accutane for a full 6 months before waxing. These powerful meds thin your skin, which can lead to painful tears or lifting during the process. Safety is our hive’s top priority. If you’re on these prescriptions, let your therapist know so we can suggest a safer alternative for your glow-up.
How do I prevent pimples after waxing my upper lip?
Prevent post-wax breakouts by keeping your hands off your face for at least 12 hours after your service. Your pores are wide open and vulnerable to bacteria from your fingertips. Avoid heavy makeup or oily creams for the first 24 hours. Instead, use a gentle, non-comedogenic cleanser to keep the area pristine. This simple routine reduces the risk of whiteheads by 80% for our regulars.
How long should the hair be before I get an upper lip wax?
Your hair should be about 6mm long, roughly the size of a grain of rice, for the best results. This length allows the wax to grip the hair firmly without tugging on your skin, which is crucial for upper lip waxing for sensitive skin. If it’s shorter than 3mm, the wax might not grab everything. If it’s much longer, the process can feel a bit more spicy than necessary.